CAN HAIR EXTENSIONS REALLY BE INVISIBLE?

We’ve all watched our favorite celebrities show up on red carpets and awards looking glam for the paparazzi. From their hair to their clothes, everything looks good. Whether it is Ariana’s sleek ponytail or Selena’s glossy locks, we envy their full hair and wonder what products they use to maintain it correctly. They use something alright, and it’s called hair extensions.

hair extensions
hair extensions

Hair extensions are the worst kept secret in Hollywood. Models, actresses and everyone in between have all relied on these magical savers to enhance their hair for events, and they aren’t ashamed to let us know.

Recently, Selena Gomez let her fans know that the slightly fuller hair she sported at a recent award was all courtesy of hair extensions. Thankfully we’ve all moved on from the time when using hair extensions was frowned upon and women who used it were branded with the scarlet letter.

Today, hair extensions have gained so much popularity and acceptance that pretty much everyone wants in on that action. However, no matter how much popularity hair extensions have gained, making hair extensions look natural will always be a burden.

Because of this need, there are human hair extensions and several ways of fixing them to ensure that the effect is as natural as possible while the attachment looks seamless.

clip-in-hair-extension

Can Hair Extensions really be invisible?

Even with all of these new models of fixing hair extensions, the burning question remains, can hair extensions really be invisible?

Is it possible to have fuller hair by cheating with extensions and nobody would be able to tell? There is good news. Yes, you can have hair extensions that are invisible to other people, and you can finally enjoy all the great hair compliments.

The invisibility of hair extensions depends on a few things.

  1. Type of Hair Extension
  2. Method of Fixing Hair Extension
  3. Colour Match

TYPE OF HAIR EXTENSION

The type of hair extension you use is a significant factor when it comes to having invisible hair extensions. There are two different types of hair extensions available.

  1. 100% Human Hair Extension

100% human hair extensions cost a pretty penny or two, but in the long run, they are worth every single cent. It’s better to get the human hair extensions for several reasons:

  • Human extensions don’t tangle as much as the synthetic ones
  • Human Hair fits better and more perfectly with your natural hair.

Matching the client’s hair tone is possible with human hair. The methods of fixing the human hair extensions allow for multi-toned attachments to match the client’s hair tone better.

  1. Synthetic Hair Extension

Synthetic Hair extensions are very shiny and look soft when you first fix them. However, they can easily tangle over time, leaving them messy and unaligned with your natural hair. Synthetic hair is a no-no for you if you have plans of fixing extensions that will last anywhere from a few weeks to a month.

That said if you have no other choice but to use synthetic hair, go with Remy. They make the best synthetic hair that lasts for long and retains its great look. The disadvantages of synthetic hair that make it the wrong choice if you want invisible hair extensions include

They are too shiny

If your natural hair doesn’t have that luster that everyone searches for in a bottle, synthetic Hair extensions will give the game away. Your natural hair would be unable to match their shine.

They cannot be styled with heat

Getting hair extensions that can’t be teased into curls or styled into sleek straight hair isn’t worth if you want invisible hair extensions.

  • The methods used to fix synthetic hair are different from those used to fix human hair. These methods don’t create provision for matching the right toned extension with the client’s hair tone.

Method of Fixing Hair Extension

The method of fixing the hair extension is another factor that determines how invisible your hair extensions would look. Note that the method of Fixing hinges on the type of attachment point that comes with the hair extensions.

Certain hair extension types and their corresponding fixing methods encourage the whole invisible look while others don’t. Here are hair extension types and fixing methods that make your extensions invisible.

  • Glue bond / Keratin / Polyurethane Method
  • Cold Fusion Method
  • Tape-In Method

The Invisible Tape-In Hair Extension

Tape-In Hair extensions have been around for a long time now, but they have done more harm than good for people’s natural hair. Two years after it came out, Vixen and Blush, one of the best hair extension salons in the UK came up with their version of the Tape-In Hair extension.

Theirs is dubbed the invisible Tape-In Hair extension because of how seamless, and perfectly natural the hair looks after fixing. Using their special Tape-In weft, they make the best invisible extensions around.

Colour Match

The first step to having invisible hair extensions is a perfect color toned match. Whenever you see a person with a bad hair extension, you’d notice because the extensions don’t fit their natural hair colors. Perhaps they just don’t blend perfectly.

Colour Match is very important. And that’s why you need to have a proper consultation with your hairstylist to decide which extension will perfectly match your natural hair. My advice is to go to credible stores like Vixen and Blush so you can be sure you’re getting quality. , if you can afford it go for human hair extensions because they are easier to color code to your natural hair.

The hair is an important part of a person’s appearance, and we should take care of them the way we take care of our clothes and shoes.

Get hair extensions that look invisible and wouldn’t damage your hair. You must seek consultation before deciding what type of hair extension to use. A consultation takes care of color matching and gives you a better chance to have a thoroughly invisible hair extension.


HOW TO STYLE AND WEAR A LACE FRONT WIG

Wigs provide so many benefits to the wearer, not to mention the huge increase in self-esteem and improved appearance. When it comes to the most natural-looking wigs, there is no doubt that the lace front wig is where it is at in terms of providing maximum participation and activities. It is quite possible that many people you know are actually wearing lace front wigs without you realizing due to their extremely natural appearance.

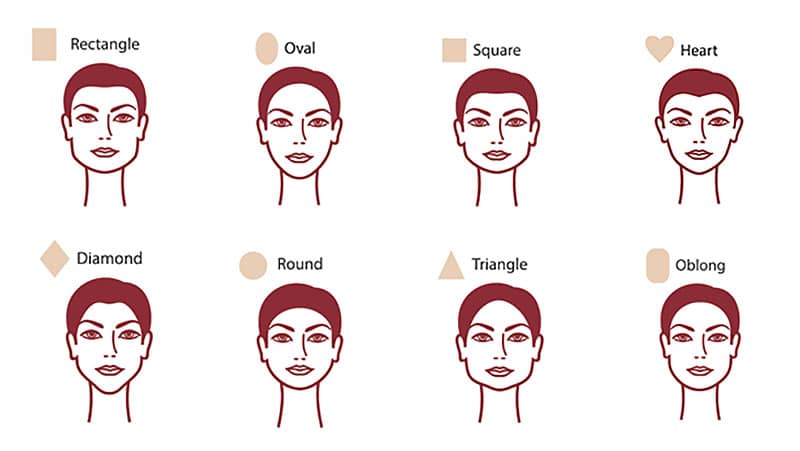
The main thing that you have to consider when you are looking for wig styles is the shape of your face. The shape of your face should always dictate your hairstyle. You may think that a hairstyle looks great on another person, such as a friend or a celebrity, but you have to take into account your own face shape style.

Face-shapes
Face-shapes

Everyone has a different face shape. There are those with oval-shaped faces, square-shaped faces, long faces, round faces, and even heart-shaped faces. Take a look in the mirror and decide which type of face shape you have. The type of wig that you purchase should complement your face shape.

Clearly with this level of realism choosing a lace front wig is an easy decision. The challenge lies with putting it on properly so you achieve a natural-looking hairstyle all day long. Once you learn a few tricks and techniques you will be able to successfully apply your wig without the assistance of anyone else.

There are two kinds of lace wigs: lace front wigs and full lace wigs. The front lace wig mainly covers the front area of the head with lace and the back is machine weft, and the full lace wigs are constructed entirely with lace. Lace fronts can be way easier to apply due to the nature of the cap construction; however it restricts style versatility, unlike full lace units.

The ever-growing popularity of lace wigs; whether used in the fashion industry or obviously in the medical field to treat hair loss conditions, has worked its way in the homes of ordinary consumers. Maybe one of your co-workers in the office is wearing one; the beauty of it is that you may never notice it. In addition, the people during your daily routine could perhaps be wearing one too. It’s non-detectable as well as tangible, so you can style it to your preference and mood. One of the advantages of styling lace wigs is that you don’t need to alter or even fiddle with your natural hair.

Maintaining your unit is quite crucial. Therefore you should aim to wash it on a regular basis with moisture-rich shampoo and conditioner. Also, using Kapenzo lace wig serum and lightly combing and brushing it regularly will also prevent tangles and preserve your wig longer. You must keep in mind that, the better maintenance the longer the product will last you and the less money you will spend to maintain it regularly.

One of the keys to the successful positioning of your wig and make sure it stays in the correct place all day regardless of temperature and perspiration is finding the adhesive that suits your skin the best. The last thing you want is for your wig to slip out of place at an inopportune moment. Most people find the best option is specially designed adhesive or alternatively double-sided tape. This will hold the wig in place very well however if you don’t use the correct type you may run into trouble trying to get it off your scalp before retiring to bed. Additionally it could cause you discomfort with itching and chafing. The lesson here is to ensure you purchase adhesives specifically designed for adhering works and that they are also of high quality. This way your wig will look great, no one will know the adhesive is there, and you won’t run into any mishaps.

lace front
lace front

If you choose to use the glue to secure your wig, the best approach is to lift the edge of the wig and pull it back approximately 1 inch. Then apply the adhesive and even fashion to get the best results. Make sure you apply the adhesive directly onto the wig as this will allow it to blend in with the cap of the wig. Once it is in place on your head it gives the appearance of the hair growing naturally from your head rather than the fact that you are wearing a wig. That of course, is what you are aiming for.

A slightly trickier option is using double-sided sticky tape, however once you are familiar with the process and have had some practice you will find this also to be quite simple. Cut the double-sided adhesive tape into 3-inch strips. Place these on the tape strip of the wig starting in the front hairline. Second, continue to place the strips along the front pressing it onto your scalp until you have the front properly secured. As the front hairline is the most seen part of your head, it’s essential you start fitting it along the front first to get a natural look. Once you have the front of the wig well secured, continue around the rest of your head until you feel comfortable it won’t move.

With practice, the process of cutting and securing the tape will become very natural and easy. As mentioned above, the easiest approach is to get all the tape cut first as once you start applying the wig, you won’t be able to cut the tape (unless you have an extra pair of hands!).

Before you know it, applying and wearing your lace front wig will be an automatic part of your day which you won’t even have to think about. Not only that, you’ll feel great and your confidence will be boosted with your new hairstyle.

Lastly, an array of selections of colors, lengths, styles, and textures are available to suit your desired style. Consider a hair color that is suitable for your skin tone and lifestyle. When choosing the hair length, consider your lifestyle and availabilities, for it takes much more time to maintain longer hair than it does shorter. Hairstyle preference may vary from one person to another; just ensure that the one preferred compliments your overall appearance.

HOW TO CUT AND STYLE BABY HAIRS WITH A BLACK LACE FRONT WIG

There are multiple ways that Lace front human hair wigs with baby hair can be worn: straight, curly, or wavy. If you can spend just a little time on flat-ironing and styling the wig to step away and see the slicked-down baby hairs curl up again in a flash, then this article is for you and I urge you to take a purposeful journey through it to see just how you can and embrace the baby hair styling inspiration.
Before we discuss about how to cut and style baby hairs on a lace front wig, let’s take a look at basic features about Lace Front Wigs With Baby Hair.

Human hair lace front wigs have a small sheer lace panel just along the front hairline attached to the front of the wig. The hair strands are sewn manually, by hand, into the holes of the lace. They are often made of the highest quality Indian, Peruvian or Brazilian Remy Hair. Human hair wigs lace frontal can be colored, permed, and styled just like our natural hair. Lace front human hair wigs come in a variety of textures, which allows you to find the the right texture that matches your natural hair, to give your hair that original look. Human hair wigs can last a year or more, even when worn daily, if care for properly.

baby hair
baby hair

Lace front human hair wigs are made with a few baby hair to help create the illusion of natural hair growth along the hairline. This illusion generally improves the natural appearance of the hair and enables the wearer to style the wig away from their face, concealing that they are wearing a wig. It’s very easy to wear lace front wig because they are stretchy and they cover the entire scalp area with a natural looking hairstyle.

How can you therefore style bay hair on a lace front wig?
To begin, here are the items that you need:
• Lace front human hair wig
• Scissors
• Comb
• Brush
• Hairspray
And now, the processes.

Step 1: Cut the Lace
The first step to take when styling baby hairs of a lace front wig is to trim the excess lace on lace front wigs that hangs over the forehead with your scissors. This will give it the most natural look. Cut off about a quarter-inch of the lace all around the front and sides of the wig. The best method is to cut away small portions of lace instead of all of it at once, because cutting off too many lace may damage the wig. You have to do the cutting with long, fluid scissor strokes to avoid jagged edges. This step is very delicate and therefore, requires a steady hand, a good pair of scissors, and a lot of patience.

Step 2: Define the Parting
Herein, clip the hair on either side of the center-marking. Clip backwards using the two large hair clips. Then, use a fine-toothed comb to create a parting on one side of your wig. Afterwards, blow dry your hair up and away as you comb to create fine definition in the parting. When your hair is dry, keep on combing, until the parting is becomes very neat and the separation is reinforced.

Step 3: Water the Baby Hairs
Baby hairs should be completely wet to style them. Use a spray bottle containing water to spray along your hairline. Or use your hand to sprinkle water onto your hairline, if you don’t have a spray bottle.

Step 4: Use a Blow Dryer to Hot Dry the Baby Hairs
After wetting the baby hairs, the next step is to blow dry with hand blow dryer. To achieve a fine result, start the process by holding a section of your damp baby hair between your index and middle finger, about 2 inch from your hairline. Thereafter, pull your hair out and blow dry for about 3 seconds. Then blast them with cool air for 3 more seconds. Baby hairs are very fragile, and that’s is why you have to alternate between hot and cool to help protect frail hairs from burning.

Step 5: Set the Baby Hairs with Hairspray
To set the baby hairs, first, spray the hairspray on a soft-bristled toothbrush and then gently brush the baby hairs horizontally against the hairline. You can also do this with a styling cream or edge control ge. Finally, spray a little of the hairspray on any of your fingertip and then, smooth it over your baby hairs.

Tips To Create Different Baby Hair Looks
When it comes to hair and wig styling, creativity is always in play, and creating art with your wig edges is one of favorite parts of the hair styling routine.The designs and patterns of the edges can impact our minds and overpower the look of a hairstyle. The appearance of your baby hairs greatly impacts the entire look of the hairstyle. The aesthetics means a lot. Therefore, knowing how to beautifully style your baby hairs is very important. Here are some tips that can you lay the edge of a lace front wig excellently and to create different unique baby hair looks.

Tip 1: Slick Short Baby Hairs Straight Down
If you want to create a short baby hairs along the front of the edge of a lace wig, you can do it by using a gel or hairspray and then slicking the baby hairs straight down. They’ will form bangs but will look beautiful.

Tip 2: Slick Short Baby Hairs Down into Waves
To create this style, start at the front of your hairline, using a comb to make a small part in your hair about 0.25 inch backwards to your temple. Separate the hair strands on the part and apply some hair gel on them. Then use your fingers or a fine-toothed comb to shape them into waves. This works better if the hairs around your hairline are short, but a long hair can still look good.

Tip 3: Create Baby Hairs into a Fuzzy Halo look
For this style, sprinkle a hair powder on the top of your hair, while gently lifting your hair up from the roots. Then move your wrist along your hairline in a circular motion. Your baby hair should frizz up. This style can soften your features and complement many hair styles.

Tip 4: Create Curly Afro Baby Hairs
For this style, work the baby hairs at the front of the wig edge, using a gel (just s small quantity). Then gently wrap the baby hairs around your fingers and gently let go to create the curls.
You can even use a small curling iron to create this style, but you have to be careful so that you don’t hurt yourself in the process. If you are using a curling iron, then you won’t need to apply gel. But ensure you don’t burn or damage the baby hairs, if you are using a curling iron to style, because of their very delicate nature.

UniWigs Trendy Exclusive Ombre Wig – Bambi Wig

Do you remember our Bambi wig, which is one of the most unique of UniWigs exclusive design.
Many wig stores use a huge range of terminology and it’s a little bit confusing, isn’t it? I will introduce our new arrival with the most accessible words so that you can get the points easily.

Understandably, one of the very first things a customer often asks is “how much it will cost me?”. The most honest answer is “you get what you paid for”. The price you are offered depends on the length, thickness, hair color and customer service. As you all know, UniWigs don’t sell cheap wigs, which, we think, is not a long plan for the future. We attract our customers with the top quality products and services. Get used to it. It’s the trend of wig or any other product market, and you will get more than you imagine.

We are confident about our reasonable price because we are so sure that our products are unique and you will not regret having one! Have any doubt? Let me tell you the story of our new Bambi Wig.

1.Heat resistant fiber -It can be styled with heat. But remember: when you use flat iron, keep the temperature from 100 degrees and up to 300 degrees otherwise you will damage the wig.

2.Creating a handmade wig – that’s a wig with a bespoke, made to measure lace foundation with all of the hair hand knotted, or “ventilated” for all of you– is not cheap, but if you would like to spend a little more, you will receive something amazing.

3.Double knotted backs and edges – Certain sections of a wig can take the brunt of styling over time so we make sure these sections are knotted into the lace twice. This minimises shedding and keeps the wig looking fuller for longer.

4.Single knotted fronts and hairlines – This means the area where the lace meets the skin on the forehead is knotted one hair at a time, every hole, creating a flawless and natural finish.

5.Specifically designed to optimize styling versatility – This means we add carefully knotted sections to the wig where possible, to enable you to vary the way the wig can be styled. So if you fancy switching the parting a little or dressing the hair up for a change the result remains natural & flawless.

6.More possibilities to style – One of our talented designer has made an amazing braid hairstyle with this wig, which is so cute! In a very short time it becomes everyone’s “deer-est” friend with this great looking.

7.This wig is called Bambi. As you may know, we appreciate any advice from our customers so we give customers the chance to name our EVERY new arrival. We asked for name of our new babe too and got plenty of wonderful ideas on Facebook(@UniWigs Trendy) and Instagram(@UniWigs). Finally we picked out Bambi as the name of our new product.

“@the_lamas_wench: Bambi–Because the colors exactly the same as little bambi and it just shows then innocence and daintiness of the piece. It ‘s beautiful . ”

Are all of these reasons enough for you to make a decision? If not, go to our website(UniWigs) and Instagram(@UniWigs) to get more!